# Tutorial Four:
Saving Data From The Feedback Form
This tutorial assumes you have successfully completed Tutorial Three "Creating A Feedback Form".
In the last tutorial, you created a form to have customer feedback sent via email. This is great if you just need customers to send you information, but what if you want to save that data for later reference or use? That's what we'll be covering in this tutorial.
Before you start, you'll need to create a table in your DotNetNuke database to store the information. You can create the table using your database tools or execute a script. The table is simple. It contains a column for each field in the form and an additional column to store a unique numeric ID for each submission we receive. The table should be named "XMP_Feedback". The table information is described below. Following that is a sample SQL script you can use or modify to create your table.
| Column Name | Data Type | Size | Allow Nulls | Additional Info |
|---|---|---|---|---|
| FeedbackId | int | No | IDENTITY, StartingValue 1, Increment Size: 1 | |
| Name | nvarchar | 50 | Yes | |
| Question | ntext | Yes | ||
| nvarchar | 50 | No |
CREATE TABLE [dbo].[XMP_Feedback](
  [FeedbackId] [int] IDENTITY(1,1) NOT NULL,
  [Name] [nvarchar](50) NULL,
  [Question] [ntext] NULL,
  [Email] [nvarchar](50) NOT NULL) ON [PRIMARY]
2
3
4
5
If you haven't done so already open the page in your site that contains the Feedback form we created in Tutorial Three.
Ensure you're logged-in as Host or SuperUser.
We're going to edit our form. So, from the Actions menu, select Manage Forms:
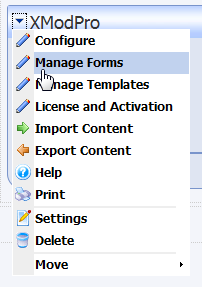
The Manage Forms page is where you add, edit, copy, and delete your data input forms. For the mechanics of how to use the Manage Forms page, refer to this topic.
Find the "FeedbackForm" form in the grid and click the "Edit" link next to its name.
We'll be modifying the form, so let's first review what we have:
<AddForm>
  <table style="border: 1px solid black; padding: 5px;">
    <tr>
      <td>
        <label for="txtName" cssclass="NormalBold">Name: </label>
      </td>
      <td>
        <textbox id="txtName" datafield="Name" width="200"/>
      </td>
    </tr>
    <tr>
      <td>
        <label for="txtEmail" cssclass="NormalBold">Email: </label>
      </td>
      <td>
        <textbox id="txtEmail" datafield="Email" width="200"/>
      </td>
    </tr>
    <tr>
      <td>
        <label for="txtQuestion" cssclass="NormalBold">Your Question</label>
      </td>
      <td>
        <textarea id="txtQuestion" rows="7" columns="60" datafield="Question" />
      </td>
    </tr>
    <tr>
      <td>
        <addbutton text="Send Your Question" />
      </td>
    </tr>
  </table>

  <email to="[email protected]" from="[[Email]]"
    subject="A Question Has Been Submitted" format="html">
    <strong>[[Name]]</strong> has submitted a question:<br />
    Question:<br />
    [[Question]]
  </email>

</AddForm>
1
2
3
4
5
6
7
8
9
10
11
12
13
14
15
16
17
18
19
20
21
22
23
24
25
26
27
28
29
30
31
32
33
34
35
36
37
38
39
40
41From this starting point, we'll need to tell XMod Pro what command to execute when the user clicks the
<addbutton>control. this is done via the<SubmitCommand>tag. This tag defines the command that is executed when the user submits the form.<AddForm> <SubmitCommand CommandText="INSERT INTO XMP_Feedback(Name, Email, Question) VALUES(@Name, @Email, @Question)" />1
2
3If you're familiar with SQL, this is a standard
INSERTcommand that create a new record, inserting the values in the parameters:@Name,@Email, and@Questioninto the columns: Name, Email, and Question, respectively. Note that there is no declaration of those parameters. That is handled for you behind-the-scenes by XMod Pro. It uses the "datafield" and "datatype" properties of form control tags to create them.Validation: Whenever you allow users to enter data you should validate that input. Since we're focused on the mechanics of linking your form to a data source, we'll touch on validation, but you'll probably want to add more.
01: <textbox id="txtEmail" datafield="CustEmail" width="200"/> 02: <Validate type="required" target="txtEmail" message="An email address is required" /> 03: <Validate type="email" target="txtEmail" message="Invalid email address supplied" />1
2
3In line 3 above, we've added a second validator to the Email text box. It is a required field validator. This will not allow the form to be submitted if the Email textbox is empty. The second validator you see in the code is the Email Validator we added in Walkthough 3. This checks to see if the email address is in a valid format ([email protected]).
That's all the changes we need to make. Our modified form definition looks like this:
<AddForm> <SubmitCommand CommandText="INSERT INTO XMP_Feedback(Name, Email, Question) VALUES(@Name, @Email, @Question)" /> <table style="border: 1px solid black; padding: 5px;"> <tr> <td> <label for="txtName" cssclass="NormalBold">Name: </label> </td> <td> <textbox id="txtName" datafield="Name" width="200"/> </td> </tr> <tr> <td> <label for="txtEmail" cssclass="NormalBold">Email: </label> </td> <td> <textbox id="txtEmail" datafield="Email" width="200"/> <Validate type="required" target="txtEmail" message="An email address is required" /> <Validate type="email" target="txtEmail" message="Invalid email address supplied" /> </td> </tr> <tr> <td> <label for="txtQuestion" cssclass="NormalBold">Your Question</label> </td> <td> <textarea id="txtQuestion" rows="7" columns="60" datafield="Question" /> </td> </tr> <tr> <td> <addbutton text="Send Your Question" /> </td> </tr> </table> <email to="[email protected]" from="[[Email]]" subject="A Question Has Been Submitted" format="html"> <strong>[[Name]]</strong> has submitted a question:<br /> Question:<br /> [[Question]] </email> </AddForm>1
2
3
4
5
6
7
8
9
10
11
12
13
14
15
16
17
18
19
20
21
22
23
24
25
26
27
28
29
30
31
32
33
34
35
36
37
38
39
40
41
42
43
44
45Once you've made the changes highlighted above, click the "Update" link.
Click the "Close" button at the bottom of the grid to return to the previous page.
You should now see the form displayed for you. It's exactly the same as before, except now it will add the data to the database as well as send the email:
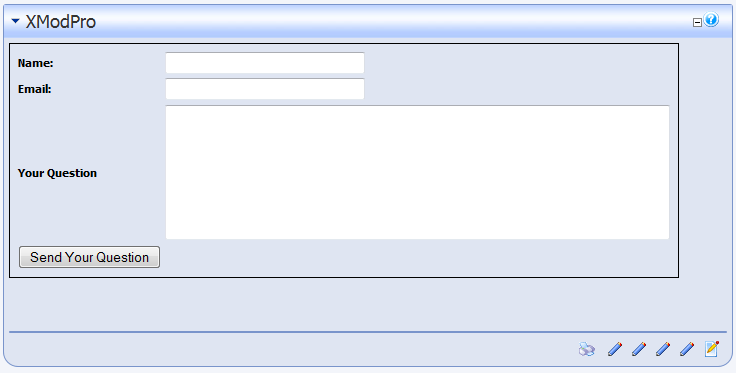
When the user clicks the "Send Your Question" button, assuming the email address is correct, an email will be sent to "[email protected]" - or whatever address you specified in the
<email>tag.